I’ve been keeping track of my notes and daily tasks using a single method for over a decade, and it works pretty well for me. Someone close to me asked me how I keep track of everything without losing track, so I figured I’d outline it here. The system is easy to use and relatively loose but with enough structure to be consistent.
First, a little disclaimer: I use this method to keep track of day-to-day activity. It is by no means a way to create a knowledge index. I use Obsidian for that and don’t think pen and paper are great tools to accomplish that goal.
I’m almost explicitly talking about managing TODO/task lists and taking meeting notes. It is a method that evolved after stealing some concepts from other journaling methods. It is irreverent of techniques and tools and rejects aesthetics; it is about pragmatism and simplicity.
I noticed that if I spend time making my notebook pretty and use expensive or imported tools, I’m less likely to use it constructively. If my choice of ink, pen, penmanship, or paper affects how I use it, it has ceased being a utility and has become an aesthetic object.
I want to be unburdened from feeling bad about using the tools I have, so I treat my notebook as nearly disposable. I write with a penmanship good enough to understand when I read it later.
Having said that, I don’t dispose of my notebooks and keep them on a shelf near my desk for reference if I need to.
I use a Clairefontaine Thread-Bound A5 dotted notebook. I’ve experimented with other brands but returned to this one simply because I can write the dates on the spine with a Sharpie and don’t have to mess around with spine stickers.
The other reason for picking this notebook is that they get thrown around, bent, dipped in coffee, stretched, stomped, and stuffed in a travel bag. This particular notebook only has 184 pages, providing just enough time to fill it before it disintegrates.
Finally, the paper in this notebook is fountain pen safe, which is great since I use a Pilot Vanishing Point most of the time. Fountain pens aren’t the most practical tools, but this one is probably the most sensible one available.
I begin a notebook by tagging it with the date of the first entry on its spine, and once it’s full, I add the final date to it. If I need to refer back to a date, I can quickly scan the date ranges on my shelf and pick out a notebook.
Unlike other methods, I don’t use a complex indexing system at the start of each notebook. However, I note each month and the page number of the first entry within that month. However, since these notebooks last less than a year, finding a date by leafing through them isn’t difficult.
All dates are ISO-8601; there is no other valid date format
Each day gets its page, regardless of if there are enough items to fill it. Though wasteful, finding a specific date is easier this way.
On the first line of the page, I write the date on the left side and an abbreviation of which weekday it is on the right-hand side.
For each task I must accomplish, I draw an empty square followed by a short description.
If the task is time-bound, like meetings, I finish the line item with an at-symbol followed by its due time.
I leave an empty line between tasks if I need to amend the task with more info later in the day.
Completed Tasks: When I complete a task, I check the box.
Obsolete Tasks: If I no longer need the task, I strike through the box.
Unfinished Tasks: If I cannot complete the task at the end of the day, I leave it untouched until the next day (see below).
Notes and Observations: If I need to jot down an observation, I start a line with a bullet and write it down concisely.
I read the previous day’s tasks at the start of a new day. If any are unfinished, I draw a diagonal arrow through the box and copy it onto this day’s list of entries as a new task.
If I am in a meeting and need to write down many notes and tasks, I do so on a separate page, noting each observation or task in the same manner as a daily entry.
On the first line of the page, I write the date on the left side, followed by the meeting’s topic.
Yes, that’s all there is to it.
You may think: “Well, isn’t this all very obvious? It seems so simple, too simple, even.”
Of course, these things seem simple in retrospect, but that’s with the benefit of not going through years of experimentation, fine-tuning, and reduction.
Like me, you may be tempted to draw tables using a ruler, use circles instead of checkboxes, use lined paper rather than dots, use A4 instead of A5, etc. Ultimately, this works for me and might work for you too.
]]>A few updates for those folks who use any of my MkDocs plugins follow below.
Version 0.1.4 of the mkdocs-live-edit-plugin was released containing changes to how the WebSocket connection to the MkDocs server is made. Also included are some error-handling improvements and visual feedback in the browser for when the WebSocket connection fails.
Version 0.7.0 of the mkdocs-alias-plugin was released, removing the use_relative_link
option introduced in version 0.5.0 of the plugin. Newer versions of MkDocs prefer relative links over absolute links, so all links created by the plugin are now relative by default, cutting down on a potential deluge of build warnings for large wikis (ask me how I know).
Much like the alias plugin, the categories plugin now also generates relative links to eliminate build errors generated by absolute links. Version 0.5.0 of the mkdocs-categories-plugin includes these changes.
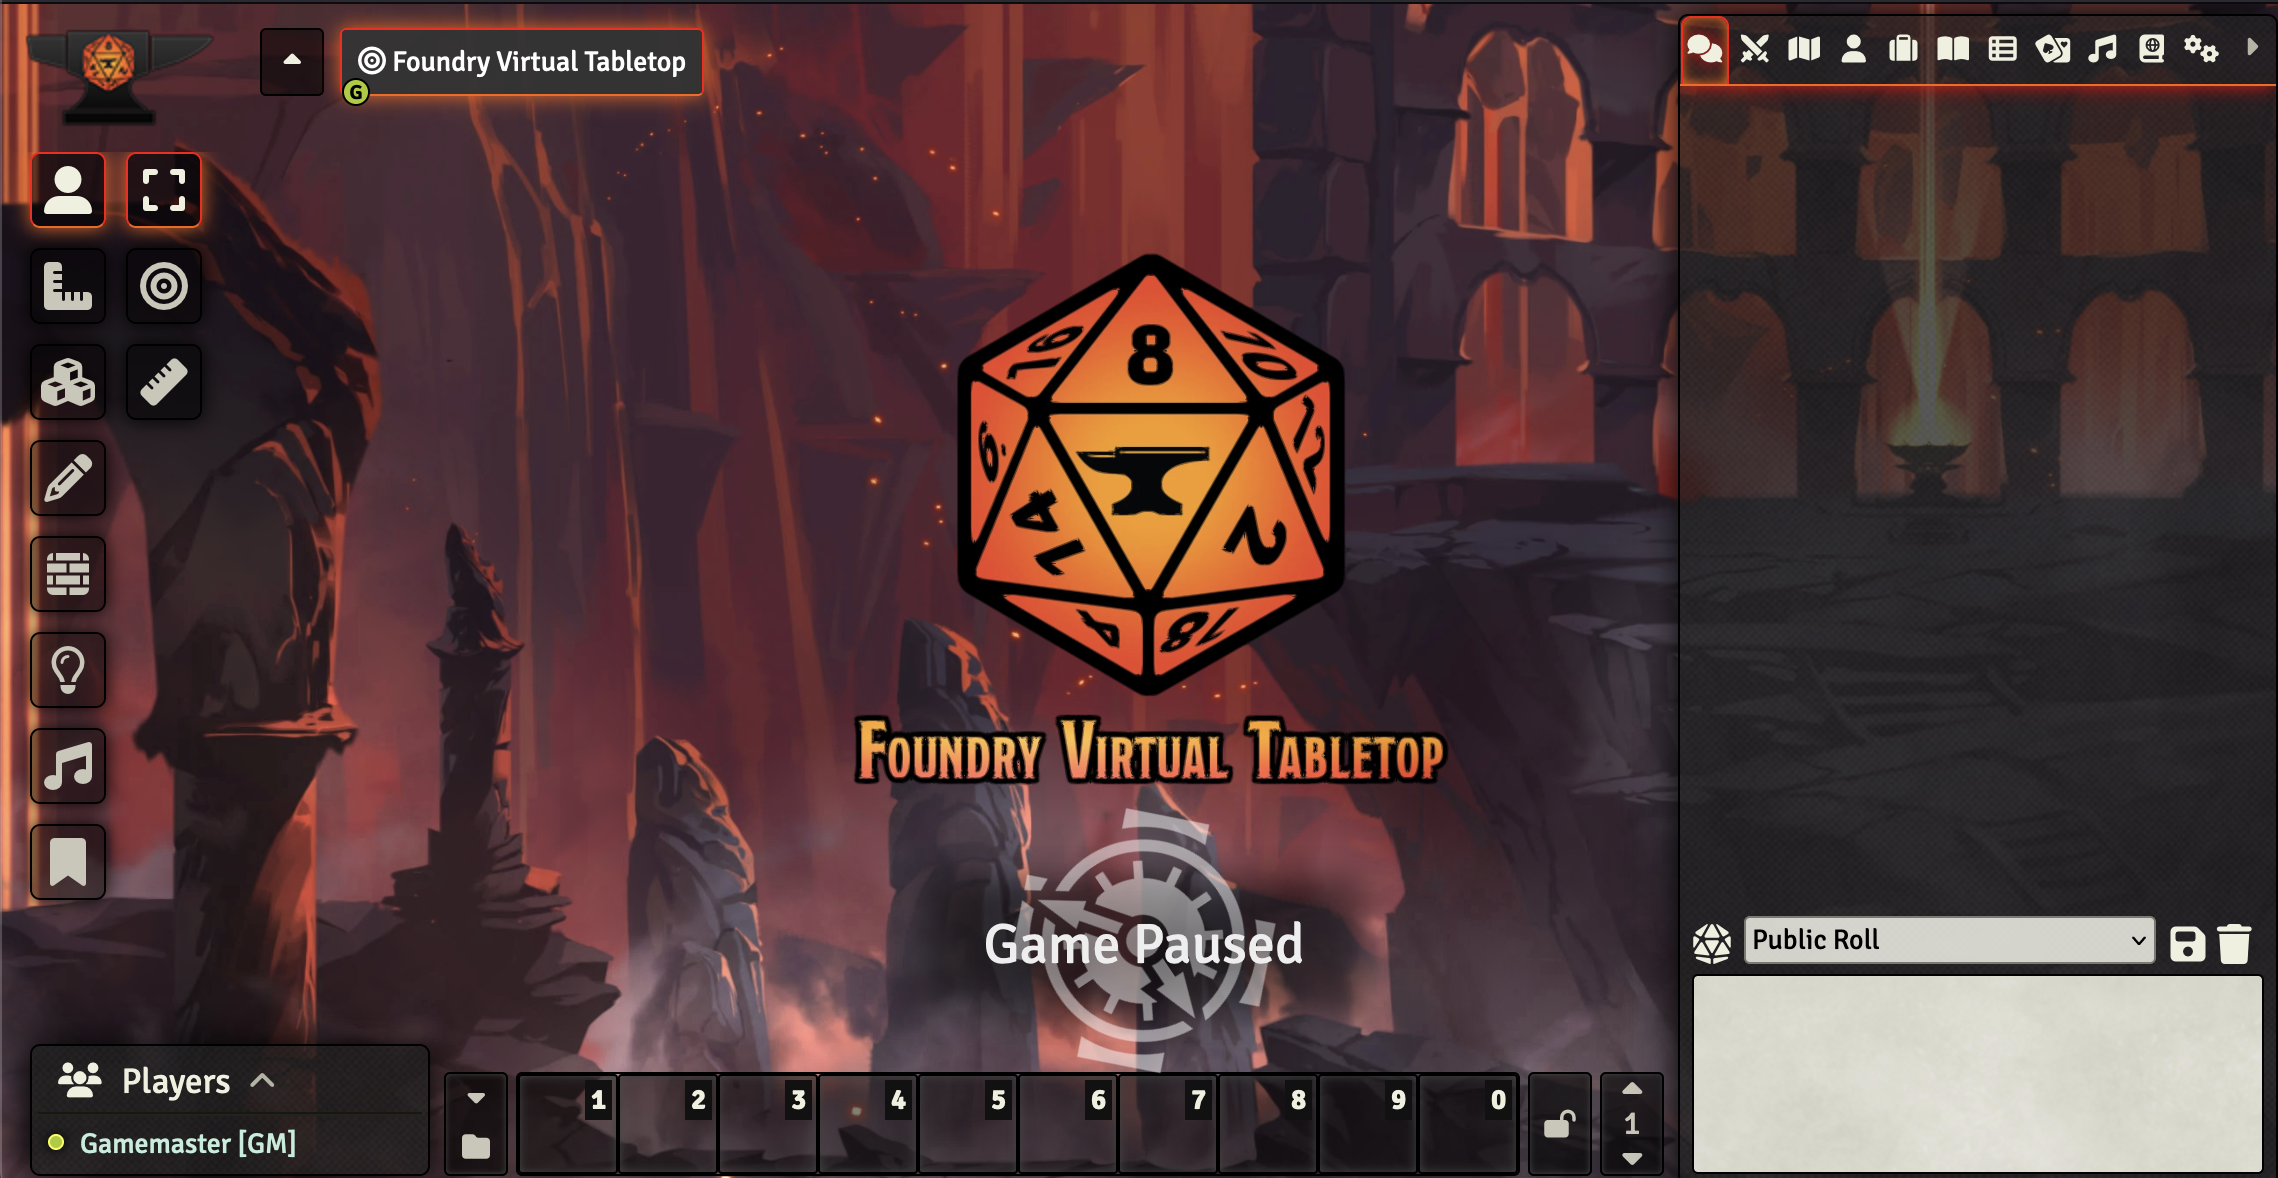
]]>I absolutely LOVE Foundry Virtual Tabletop (FoundryVTT). It is by far the best $50 I’ve spent on my tabletop role-playing hobby in years. I can gush about the software on and on, and perhaps I will in a future post. This post, however, focuses on something a bit more practical.
For years, I’ve hosted my instance on AWS, but with the change to their public IP address pricing, it doesn’t make sense to stay with them since DigitalOcean offers a beefier solution at a lower monthly cost.
Here’s what I’ll walk you through today:
At the time of writing (January 15, 2024), the current version of Foundry is 11, so these instructions could change in the future. However, they were practically identical two years ago when I installed version 9. But, YMMV.
Log in, or create a DigitalOcean account, first. Once you’ve done that and logged in to your dashboard, create a droplet.
The physical location you pick matters quite a bit since the distance from your players to your server can affect gameplay. If there’s much latency, things such as token movements and dice rolls appear sluggish, so pick something nearby.
Next, pick the Ubuntu machine image. I picked Ubuntu 23, and the rest of this post will assume that you’ve done the same.
For the authentication method, I suggest setting up an SSH key since it is the more secure option. I also picked the free improved metrics option, which allows you to monitor server stats from your DigitalOcean dashboard.
For Droplet type, pick “Shared CPU” and the “Regular” CPU option, the most affordable selections. Since Foundry requires at least 2 GB of RAM, pick the 2 GB/1 CPU plan. I don’t think you’ll need more than that since most of Foundry’s computational complexity is performed in your player’s browser window. However, you can pick something beefier than that if you think you’ll be installing many modules or plan to run other things on the server.
Finally, click “Create Droplet,” and you’re done.
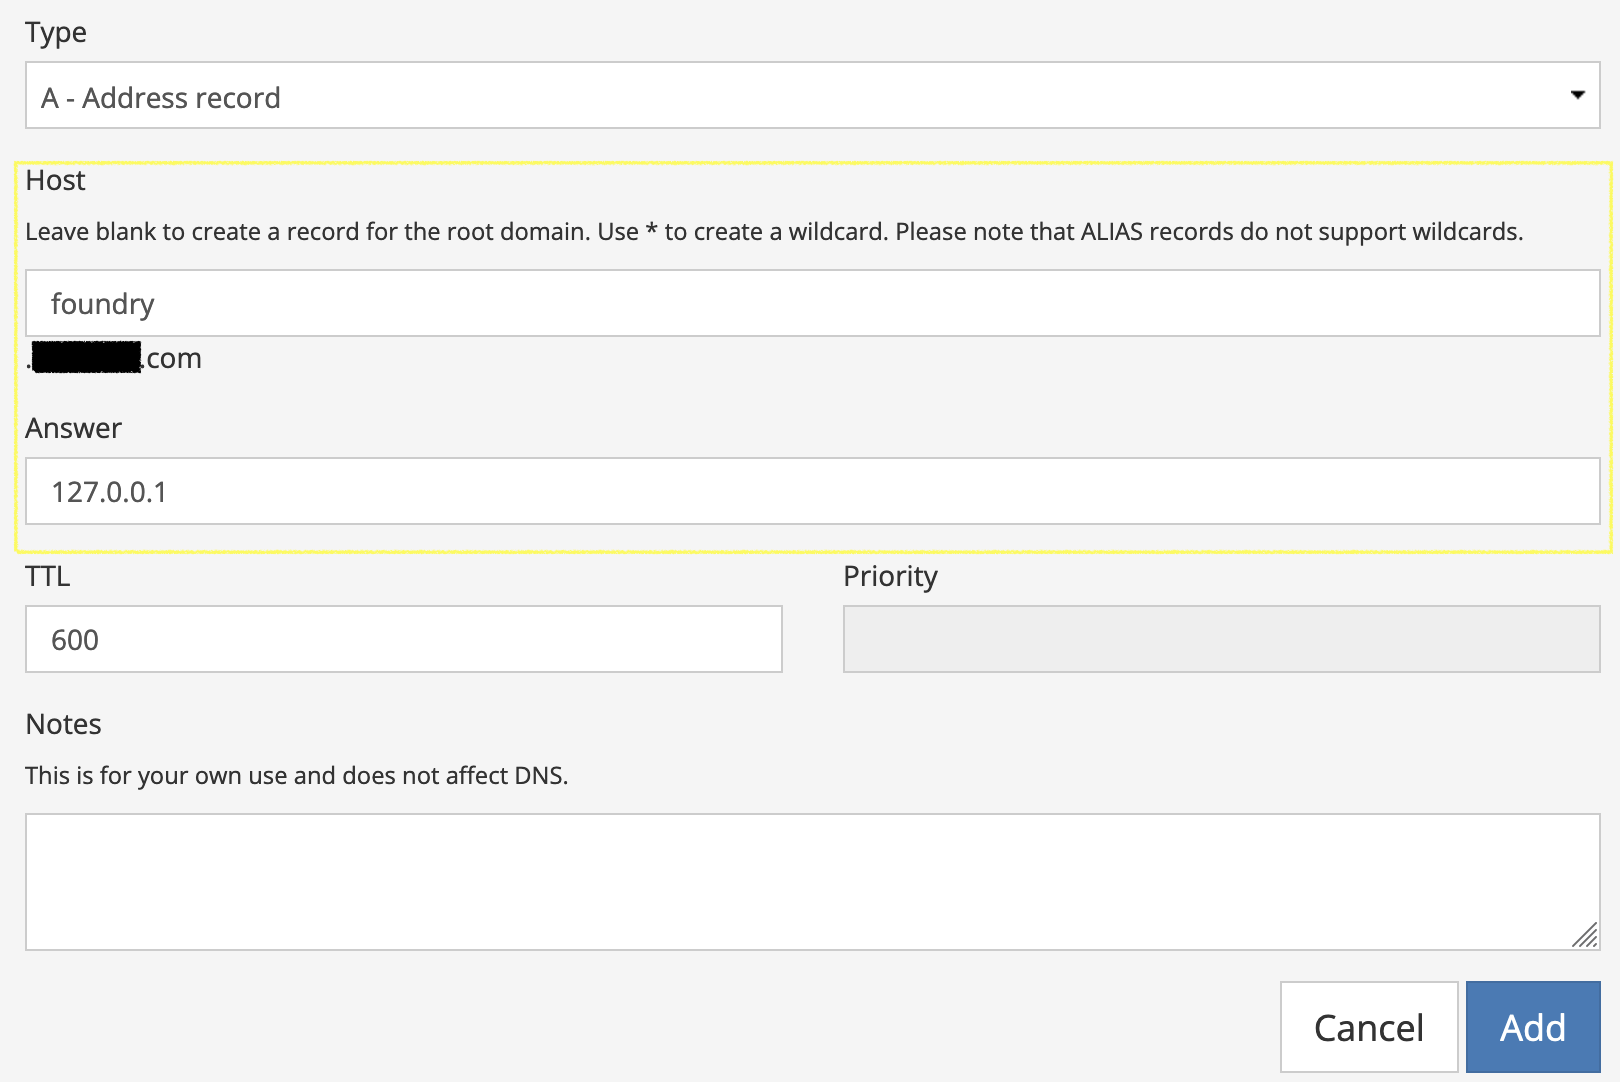
Once your Droplet finishes creating, note its public IP address. Next, using your registrar of choice, add an A Record for your domain name. If you want a subdomain (e.g.: foundry.example.com
), enter something in the “Host” field, but if you want the root domain (e.g.: example.com
) to host your Foundry instance, leave it empty. For the “Answer” portion of the record, enter your Droplet’s public IP address. Add the record and you’re done with this step.
Next, we’ll log in to the Droplet and begin setting up some prerequisites. The method of how you log in to your server depends on whether you chose the SSH or password-driven authentication method during Droplet creation. However, there’s a web-based console available, which works in a pinch if you don’t want to mess around with terminals.
If you do, you can SSH as root using ssh root@THE_IP
where you must substitute THE_IP
with your server’s public IP address or the hostname you set up in the previous step.
Once you’re logged in, verify that you’re logged in as root
by executing the whoami
command. If the answer is somehow not root
, switch by executing:
sudo su -
Next, we’ll update the server software:
apt update && apt upgrade -y
This simply upgrades any pre-installed programs already on the server and ensures that you’re starting from a clean slate. If you are prompted by anything during this process, simply pick the default options since this is a brand-new installation. Once complete, reboot the server if after updating it is recommended to do so:
reboot
Your connection will be terminated while your server restarts. Once restarted, SSH back into your server as root
and install the prerequisite software for our project:
apt install -y unzip certbot wget
We’ll need the unzip
command to extract the FoundryVTT ZIP file we download later, certbot
to set up an SSL certificate, and wget
to download the FoundryVTT ZIP file.
Foundry is a Node.js application, so, naturally, we’ll need to install it on our server. However, rather than installing Node.js through our package manager, we’ll use the Node Version Manager (NVM) to manage our installation. This program allows for easy installation of Node.js runtimes and upgrading to new ones once the time comes.
Run the following command:
wget -qO- https://raw.githubusercontent.com/nvm-sh/nvm/v0.39.7/install.sh | bash
Since this post is written at a fixed point in time, it is worth verifying that this command is still the correct one in the NVM documentation.
Accept any prompts that are presented and once installed, execute the following command:
source ~/.bashrc
Verify that NVM was installed correctly:
nvm --version
Which should output a version number.
Now that NVM is installed, we can install Node.js, which is as simple as running:
nvm install --lts
Once completed, you can verify the installation by running the following command, which should match the LTS version number stated on the Node.js official website:
node --version
We’re fairly well-equipped to install Foundry on our server at this point. Yet, there are a few more steps that remain. First, ensure that you’re in the root user’s home directory:
cd ~
Now, we’ll need to create two directories for Foundry to work correctly. First, the user data directory which hosts all of your modules, maps, characters, uploads, etc. This is also the directory that you’d backup if you so desire:
mkdir foundrydata
Second, create and cd
into the Foundry installation directory, which simply hosts the core Foundry software. You don’t need to backup this directory since there is no configurable or user data present here:
mkdir foundryvtt && cd foundryvtt
Next, log into your account at foundryvtt.com. Next, click on your username, then navigate to the section named “Purchased Licenses.” Here, select the recommended release version from the dropdown, “Linux/NodeJS” as the operating system and click the “Timed URL” button. You now have a temporary download link to a Foundry installation package in your clipboard:
Execute the following command while still cd
-ed into the foundryvtt
directory, replacing the YOUR_URL
bit with the temporary link in your clipboard:
wget -O foundryvtt.zip "YOUR_URL"
Make sure to include the double quotes around the URL or wget may have a difficult time downloading the ZIP file. Once it completes downloading, run ls -l
to verify that you see the foundryvtt.zip
file in the foundryvtt
directory and that it’s not zero bytes long. If it is, your download link may have expired, so repeat the steps above to regenerate a link.
If everything looks good, unzip the ZIP file and delete it once done:
unzip foundryvtt.zip && rm foundryvtt.zip
If you’d rather keep the ZIP file, you could simply move it out of this directory into a safe place, like $HOME
.
Now that Foundry is installed on your server, we’re ready to run it for the first time. This initial start is performed to populate the foundrydata
directory with the files and directory structure that we’ll need to do further configuration:
node resources/app/main.js --dataPath=$HOME/foundrydata
Open your browser to the A Record you created in the “Domain Setup” step above, using port 30000 in the URL for the time being until we configure Foundry to use SSL:
http://yourdomain.com:30000/
You should be presented with a screen to enter your license and accept terms and conditions. You can find your license key in your account on the FoundryVTT website. It’s advisable to set an administrator password during this step as well since your instance is exposed to the internet. Once that’s complete, click on the “Configure” button which looks like a set of gears.
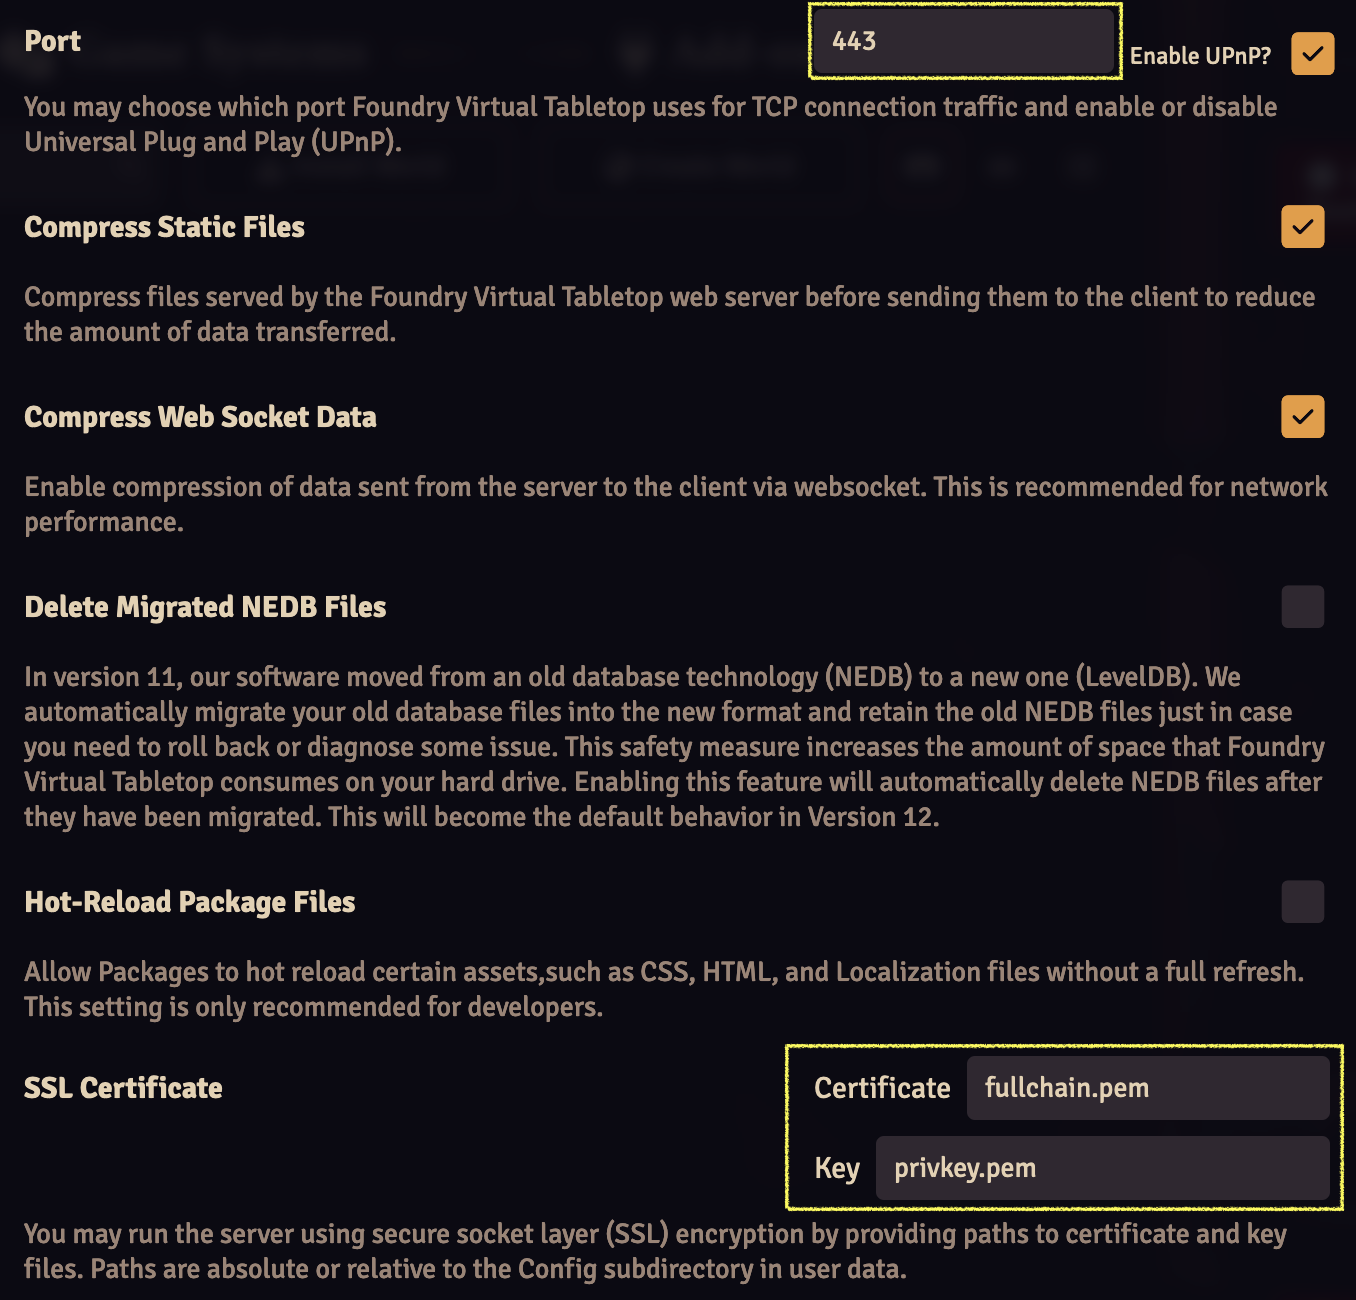
Fill out the following fields with these values:
443
fullchain.pem
privkey.pem
Click the “Save Configuration” button below and close the browser window. In your SSH terminal, hit Ctrl+C
to end the Node.js process running the Foundry server.
If you only wanted a server that you could occasionally boot up and didn’t mind the random port number, you would be done at this point. However, let’s be a bit tidier and set up a proper SSL certificate from Let’s Encrypt for our Foundry instance:
certbot certonly --standalone -d YOUR_DOMAIN
Substitute YOUR_DOMAIN
with your actual domain name and fill out any prompts that may appear. Once this completes, verify that certbot will actually automatically renew your SSL certificates by running:
certbot renew --dry-run
If that looks good, create the following two symlinks in your foundrydata
directory, replacing YOUR_DOMAIN
with your real domain name:
ln -s /etc/letsencrypt/live/YOUR_DOMAIN/fullchain.pem /root/foundrydata/Config/fullchain.pem
ln -s /etc/letsencrypt/live/YOUR_DOMAIN/privkey.pem /root/foundrydata/Config/privkey.pem
By creating symbolic links rather than copying the .pem
files, your server will remain up-to-date whenever certbot auto renews your SSL certificate.
Of course, we don’t want to start the server manually each time we want to use it. To automate this, we’ll use PM2 to daemonize the Node.js process:
npm install pm2@latest -g
Run pm2 status
to verify that it was installed correctly. Once installed, it’s as simple as adding the process we ran before to PM2:
cd $HOME/foundryvtt && pm2 start resources/app/main.js --name foundryvtt -- --dataPath=$HOME/foundrydata
Now, when you run pm2 status
, you should see a process named foundryvtt
in the list.
You should now be able to visit the same URL as before without having to supply a port. And, with that, you’re ready to use FoundryVTT.
I’ll leave you with a few notes:
Whenever you change the server’s configuration, you’ll be reminded to restart Foundry. You can do so by running pm2 restart foundryvtt
. I suggest reading up on some basic PM2 commands in case you run into issues or need to stop and start the process. For example, you’ll probably want to know pm2 log foundryvtt
if something goes wrong on the server.
As I mentioned before, it’s not a bad idea to backup your foundrydata
directory occasionally. As of version 11, Foundry has built-in functionality to make manual snapshots. I highly suggest reading the documentation on how to use this.
Also, make sure that both you and your players use passwords to gain access to your Foundry instance. Remember that your server is open to the entire internet, so make those passwords nontrivial.
Finally, be careful with upgrading Foundry to major versions. Make sure that all of the modules that you rely on are already compatible with the latest version. If not, wait. Foundry development moves fast and module developers sometimes take quite some time to catch up.
Enjoy!
]]>I was recently invited to join Bluesky, a new social media platform. This was mostly motivated by the nightmare that Twitter has become over the past year or so. One of Bluesky’s nice features is the encouragement from the official team to build supplementary software. One way to do it is to build a custom feed. So, I set out to do just that: I built a feed that serves all posts related to TTRPGs on Bluesky. Here’s how I went about publishing mine on a DigitalOcean droplet using PM2, Nginx, and Let’s Encrypt.
Step One is simply to fork this example repo and follow the directions in the README.md file to get it up and running.
Once you have it all set up, head into subscription.ts
and begin modifying its contents to fit your needs. This file receives the “firehose” of all new posts created on Bluesky, so you can create whatever arbitrary logic you wish to define right here. That’s really all there is to it. I won’t go into too much detail since you can explore the types exported by the packages, but it’s easy to match on the following:
ops.posts.creates
is a list of all of the new posts created since the last pollops.posts.creates[n].record.text
is the actual full text of the new postops.posts.creates[n].author
is the author’s unique ID on the platformFrom here, you could for example perform some matching against the text and define an include or ban list based on the author ID.
Once you’ve defined your feed’s logic, you’ll want to change the endpoint at which it serves. By default, there’s a file named whats-alf.ts
that defines the name and handler function for your feed. Rename the file to something that suits your needs better. There are two things exported from this file: a shortname
variable that defines the name of the feed endpoint and the handler function for the feed. Change the shortname
to something else more representative of your data.
The file index.ts
imports from the above file and exposes the endpoints served by your application. You’ll want to update your imports here to point to your renamed file:
// ... snip ...
import * as ttrpg from './ttrpg'
type AlgoHandler = (ctx: AppContext, params: QueryParams) => Promise<AlgoOutput>
const algos: Record<string, AlgoHandler> = {
[ttrpg.shortname]: ttrpg.handler,
}
export default algos
You may need to restart the application if you’re running it locally and change the browser URL to point to the new name.
Running a Droplet on a DigitalOcean is the most affordable method I could find to run this (unless you have AWS credits to spare). I simply started the smallest instance available and used the Node.js template to get started. The machine image already comes with PM2, Git, and Nginx pre-installed.
If you enter your server’s public IP address in your browsers, it will display the “Hello, World” app’s output with a few useful links.
Once you have your machine up and running and SSH into it, you’ll need to get your code there. I’ll leave the details on how you accomplish this to you. But since Git comes pre-installed as well, it was easy enough for me to pull down my repo into the /var/www/html
directory (web root), which is the default location that Nginx serves from. Don’t forget to wipe the contents of that directory first to prevent conflicts. The machine image also comes with a dedicated SFTP user, so that’s another option to get your code there.
hello
AppNow that your code lives in the web root, you’ll want to stop and delete the “Hello World” app currently running:
sudo -u nodejs pm2 stop hello && sudo -u nodejs pm2 delete hello
Notice that the user who owns the PM2 process is nodejs
, which is a pre-configured non-root user. We’ll reuse this user in a bit for our own app.
Before we begin, follow the instructions to install Yarn on your server. You’ll need this to run the application.
Now, run the following commands from the web root:
yarn && yarn start
You should now have an identical feed to what you had on your local machine running on your public IP. Once verified, shut down the process with Ctrl+C.
Manually running the process isn’t a great idea since it will shut down the moment you close your SSH session. That’s where PM2 and that nodejs
user come in. Register your app with the following command:
sudo -u nodejs pm2 start yarn --name ttrpg-feed -- start
Substitute ttrpg-feed
with whatever name you want. You’ll use this to refer to the process managed by PM2 over time. Now run:
sudo -u nodejs pm2 status
You should see something that looks like this:
If your app isn’t running, you can start it using this command:
sudo -u nodejs pm2 start ttrpg-feed
You can monitor the output of your feed using the following command:
sudo -u nodejs pm2 log
You’ll want to save this command to troubleshoot issues.
I run my feed on a custom subdomain, which is necessary for the next step: adding SSL connectivity. To do this, create a new A record in your DNS management tool that points to your Droplet’s public IP address. Once set up, you should be able to view your feed on that subdomain over HTTP.
One of the requirements of hosting a custom Bluesky feed is that it must be served using SSL on port 443, the default HTTPS port. To do this, we’ll use Let’s Encrypt.
DigitalOcean has a detailed tutorial on how to do this, but I found that I only needed to do a few things since so much comes preconfigured on these Droplets.
Use your favorite text editor to modify the server_name
entry of /etc/nginx/sites-available/default
to match your subdomain.
Next, you’ll need Certbot, which facilitates the process of getting an SSL cert, and the Nginx plugin for Certbot.
sudo apt install certbot python3-certbot-nginx
Once installed, restart Nginx:
sudo systemctl reload nginx
Now, let’s generate the SSL certificate:
certbot --nginx -d my.domain.example
Once you get to this screen, pick the redirect option (2) to force all HTTP traffic to be converted to HTTPS:
Please choose whether or not to redirect HTTP traffic to HTTPS, removing HTTP access.
- - - - - - - - - - - - - - - - - - - - - - - - - - - - - - - - - - - - - - - -
1: No redirect - Make no further changes to the webserver configuration.
2: Redirect - Make all requests redirect to secure HTTPS access. Choose this for
new sites, or if you're confident your site works on HTTPS. You can undo this
change by editing your web server's configuration.
- - - - - - - - - - - - - - - - - - - - - - - - - - - - - - - - - - - - - - - -
Select the appropriate number [1-2] then [enter] (press 'c' to cancel):
At this point, you should be able to view your feed using the HTTPS protocol since this process changes your Nginx configuration. If not, try restarting Nginx or your app.
You may notice that your feed’s URL still contains the sample did
provided by the base GitHub repo. Let’s ensure that once published, this feed is tied to our user.
To find your DID, visit this URL and replace the username in the URL with your own.
Once you have your DID, create a .env
file in your webroot and add the following lines, substituting the values for your own:
FEEDGEN_PUBLISHER_DID="did:plc:YOUR-DID"
FEEDGEN_HOSTNAME="your.subdomain.example"
Restart your application using PM2 and substitute the DID in the URL for your own.
Please remember: do not commit your .env
files!
The final step before publishing your feed to Bluesky is to modify the values in scripts/publishFeedGen.ts
with your own. You should generate an App Password by visiting your Bluesky Settings screen and generating one there. The nice thing about App Passwords is that you can revoke them in case they become compromised. You don’t want to compromise your main password!
There are more details in this file, and I’ll leave filling them up to you, but please ensure not to commit your password
entry to Git. Preferably, you’ll want to place it in your .env
file and pull it from there.
Once you’re ready and you’ve verified that your feed is running using the correct DID, you’re ready to publish your app to Bluesky:
yarn publishFeed
On success, you should see the following message:
Once published, you should see the feed show up under the “Feeds” tab on your profile:
By default, the feed uses an in-memory SQLite database. To persist data use persistent storage, such as a disk-based SQLite database. Add the following line to your .env
file:
FEEDGEN_SQLITE_LOCATION="db.sqlite"
Now when you restart your app, the feed should persist and you should see a db.sqlite
file in your web root directory. If you’re getting “readonly” errors, it means that the nodejs
user isn’t allowed to write to the database file. Use chmod 777 db.sqlite
to allow the user to write to it.
I also recommend installing the SQLite command line tools so you can quickly query the database file:
apt install sqlite3
Finally, you’ll want to create backups of these database files in case something goes wrong in your web root directory. The simplest way to do this is by setting up a cron job that copies the db.sqlite
file to another location on a timer.
The simplest (and least secure) way to do this is by using a cron job to copy the files to another directory. Since none of the data in these databases is critical, I’m fine with using this solution. This is the backup script I created, saved as ~/db-backup.sh
:
#!/bin/sh
DATE=$(date -I)
cp /var/www/html/db.sqlite "/root/db-backups/$DATE.db.sqlite"
Save it, then make it executable:
chmod +x ~/db-backup.sh
Create the directory where the files will live:
cd ~ && mkdir db-backups
Now, we schedule it to run at midnight every day. Run crontab -e
and add the following schedule to the file:
0 0 * * * /root/db-backup.sh
It might be worth it to have a dedicated DB server to store the data if you’re getting serious traffic, but since this thing is a toy, SQLite works for me.
The easiest part of this entire process was writing the code. Setting up a server and getting the feed hosted correctly was quite tedious, so I hope this helps you out and points you in the right direction.
]]>If you’re on Linux and received the latest Steam patch that makes your UI scaling look overly large, here’s a quick workaround until Valve fixes the application (and given that you have a Steam desktop shortcut).
Open up the Steam desktop launcher shortcut (~/Desktop/steam.desktop
) in your favorite text editor and find the line that starts with Exec=
. You’ll want to change it to the following:
Exec=/usr/bin/steam -forcedesktopscaling 1.0%U
You can change the scaling factor to something other than 1.0, but that’s the value that worked for me without breaking the entire UI. The only downside is that you’ll have to launch Steam from this desktop shortcut until Valve fixes this.
]]>I just can’t seem to stop myself from making more MkDocs plugins. This time, it’s a plugin that can help with editing by allowing you to edit your Markdown files straight from the browser:
Install the package by using pip:
pip install mkdocs-live-edit-plugin
This makes it easier to make small changes to wiki pages without constantly having to Alt+Tab back and forth. I have some more ideas to extend this plugin’s capabilities such as creating new pages and moving pages, but that’ll have to wait for a future version. For now, if you end up using it, I’m interested to know what you think about it.
You can get your own copy of the plugin right here.
]]>The latest version, v0.4.0, of the mkdocs-categories-plugin is now available here or by running pip install mkdocs-categories-plugin
. This new version fixes the sorting of categories containing numbers. This release is a minor quality-of-life update, but I can’t believe I didn’t notice this behavior before!
v0.3.0 | v0.4.0 |
---|---|
After using ChatGPT for a few months, I’m developing a sour taste for the whole generative AI thing. It’s not because it’s not good at what it does. Most of the time, it’s incredibly proficient. I’ve mainly used ChatGPT to bounce ideas off and to give me suggestions – riffing on concepts. It’s an excellent tool for those tasks, usually generating a decent output. It’s not because of that. I’m beginning to dislike generative AI because it makes you feel like you’ve had anything to do with the creative process.
I get this uneasy feeling when I ask ChatGPT to “create” something more substantial than a list of ideas based on a prompt. There’s a voice that lingers in the basement of my mind while ChatGPT spits out another paragraph:
This prompt expresses my creativity, therefore the output is a product of my imagination; I made this.
I can fine-tune a prompt for hours to generate an output that resembles what I expect to see. I put in the effort, and the result improves over time. It is almost like I imagined it myself. And when I click the “Regenerate Answer” button, I receive something else entirely, but equally good.
It’s satisfying, but I still feel uneasy. Sure, though I’ve shaped the content through my prompts, I didn’t imagine it. It’s not even in my style. If anything, I’m simply passively consuming the output. Then, when I think it’s good enough, I can choose to distribute it, iterate on it, or use it in my own work. Creativity is not part of this process.
The basement voice objects:
Yeah, but given enough time and effort, I would have come up with something similar eventually.
No matter how much I want the idea to be my own, it’s simply not true. When I sit down and plot a story, it inherits my experiences, interests, and environment. ChatGPT is entirely separate from these things and will pull from the same sources every time, no matter how much you tweak the prompt.
But so do you!
Yes, but they’re my sources, not someone else’s.
I like ChatGPT because it makes it easy to feel creative. I like it because it’s this near-magical thing that entertains me. I like it because I don’t have to suffer as much through the blank-page period.
None of these things benefit me.
If creativity comes without effort, I’m not being creative. I’m not improving my creative skills if I ask someone or something else to do the work for me. At most, I’m commissioning a piece. At worst, I’m consuming someone else’s work and calling it my own. By definition of being externally generated, it cannot be a reflection of my personality.
So, am I rejecting ChatGPT and generative AI entirely?
No, I still think it’s a useful tool for validating ideas, especially non-creative ones. For example, it’s great for generating boilerplate code. But I will no longer use AI tools when what I’m creating is supposed to mean something to me.
]]>Open up the command line and create a directory for your project, then cd
into it.
Register the apt repositories listed on this website.
Install .NET Core:
sudo apt install dotnet-runtime-7.0 dotnet-sdk-7.0
Once installed, set up a solution:
dotnet new sln
Followed by the main executable project:
dotnet new console -o game --use-program-main
I named the project game
, but call it whatever you want. While still in the solution directory, add the new project to the solution:
dotnet sln add game
Now cd
into the game directory and add the OpenTK package:
dotnet add package OpenTK
That’s it. Follow the tutorial at The OpenTK site, and you should be up and running. If you install the official C# extension, you should be able to use the same keybindings from Visual Studio to run and debug your program.
I can’t think of an easier way to create a cross-platform OpenGL executable than this. This setup is great for little demos and trivial graphical apps that don’t need to be blazing fast. Not to mention being able to do your primary development cycles in Linux, with its dev-centric *nixy tools, and switching to Windows once the program is completed and ready for distribution. It’s a far cry from the burning hoops I had to jump through a decade ago with Mono and a lack of tools outside of Windows.
]]>pip install mkdocs-alias-plugin
. This new version adds the ability to use anchors within aliases, e.g.: [[my-alias#my anchor]]
would link to something like my-page.md#my anchor
.
Also updated is the mkdocs-categories-plugin, version 0.3.0 is available here or by running pip install mkdocs-categories-plugin
. This version adds support for subcategories, allowing you to create structured category hierarchies.